
How to Move Your Mint Data Into WealthMode (CSV Guide)
Still have a Mint export sitting in your downloads folder? Here's how to import those transactions into WealthMode, and what to do if you never exported.
About this guide: Details about Mint and its export format below are based on publicly available information and on exports produced before the service was discontinued in 2024. Formats described here reflect what those files typically contain. Opinions expressed here are our own.
Mint closing in 2024 left a lot of people with a folder of financial history and nowhere obvious to put it. If you exported your transactions before the shutdown, that file is still perfectly usable, and it holds years of categorized spending that would take a long weekend to recreate by hand.
This guide covers importing that file into WealthMode, including the one formatting quirk in Mint’s exports that generic importers tend to get backwards. If you never exported, skip to the last section, because there’s still a reasonable path.
If you’re comparing options rather than importing, the Mint alternative guide and the WealthMode vs Mint comparison cover that. This post is about the file.
What a Mint export contains
Mint exported transactions as a single CSV, one row per transaction. A typical file carries:
- Date and Description
- Original Description, the raw text from the bank before Mint cleaned it up
- Amount, written as a positive number
- Transaction Type, marking each row as a debit or a credit
- Category, Account Name, Labels, and Notes
The important part is the combination of the last two in that first group. Mint did not write negative numbers for spending. Every amount is positive, and a separate column says whether the row was money out or money in.
This is where a naive import goes wrong. An importer that only looks at the amount column sees a file of positive numbers and reads your entire year as income. WealthMode reads the debit and credit column as authoritative and uses it to set the direction of every row, so a positive 82.14 marked as a debit lands as an 82.14 expense.
Mint’s Original Description and Labels columns are also recognized, so the raw bank text and your labels come across rather than being dropped.
How to import your Mint export into WealthMode
Create a free account if you don’t have one. No credit card is required, and the free tier is enough to import and budget.
Open the CSV importer from your transactions and upload your Mint file.
Confirm the mapping. WealthMode reads both the headers and the values to work out which column is which, including the date format. Mint’s layout is a familiar one, so most of this should already be correct when you see it. Check it anyway, since it takes a moment and the preview later depends on it.
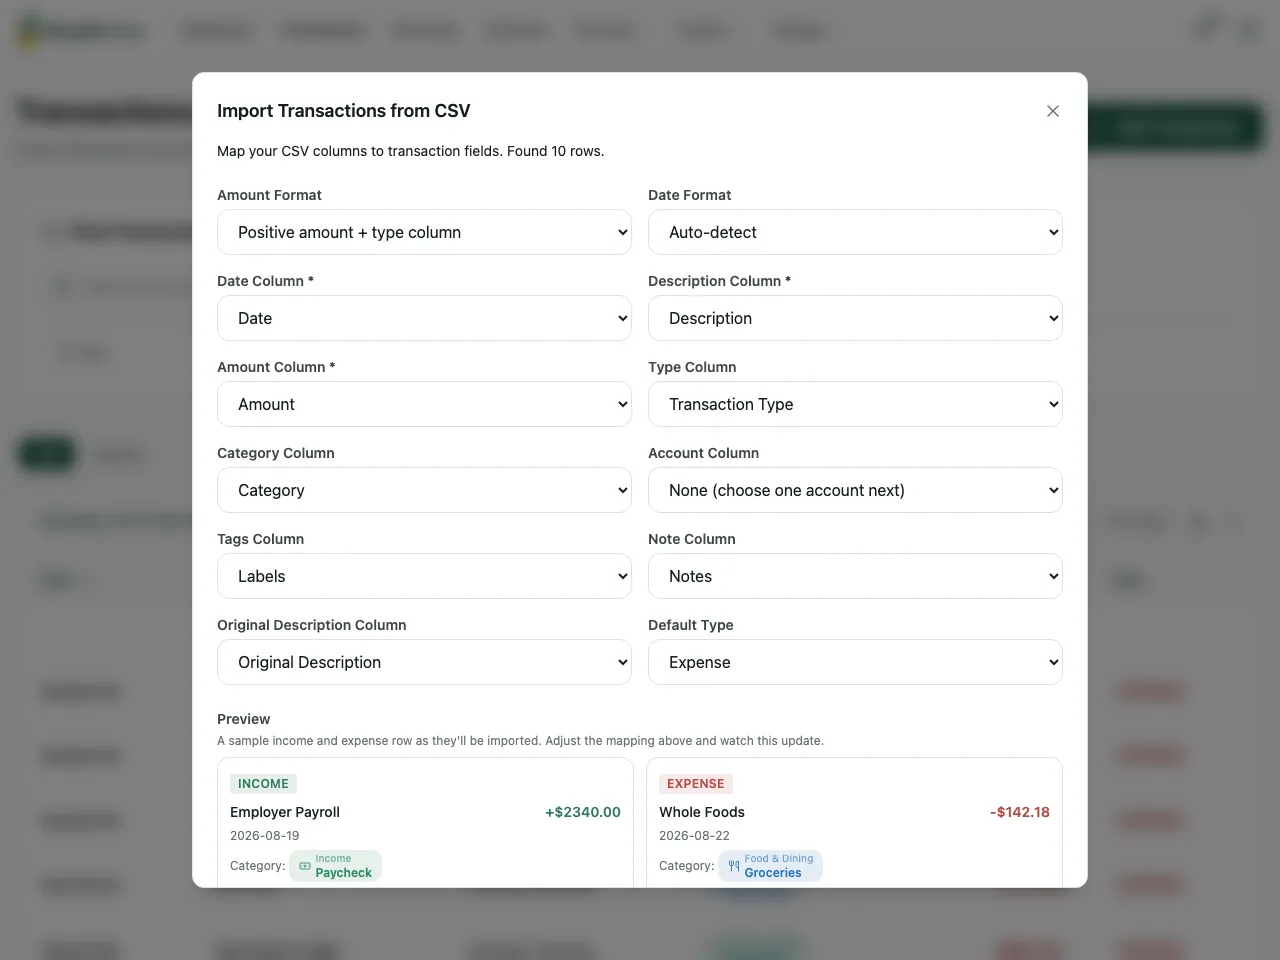
The Amount Format line is the one to look at. It reads “Positive amount + type column”, which means the importer has understood that your amounts are all positive and that the debit and credit column decides direction. The live preview underneath shows one income and one expense row as they will be imported, so you can confirm the direction is right before going further.
Route your accounts. Mint exports include an account name per row. Match each one to an account in WealthMode, or send everything into a single account if you’d rather not split them out. Names that already match are filled in for you.
Place any unmatched categories. This step appears only if there are Mint category names that don’t line up with yours. You map each one once and it applies everywhere it’s used. Mint shipped a fairly large default category list, so expect a handful here.
Review the preview. Nothing is written until you confirm. WealthMode runs the rows through a dry run first and shows you how each will land, with your transaction rules already applied. Likely duplicates are flagged, which matters if your export overlaps with transactions you’ve already imported or synced. You can edit a description or category inline, or deselect rows you don’t want.
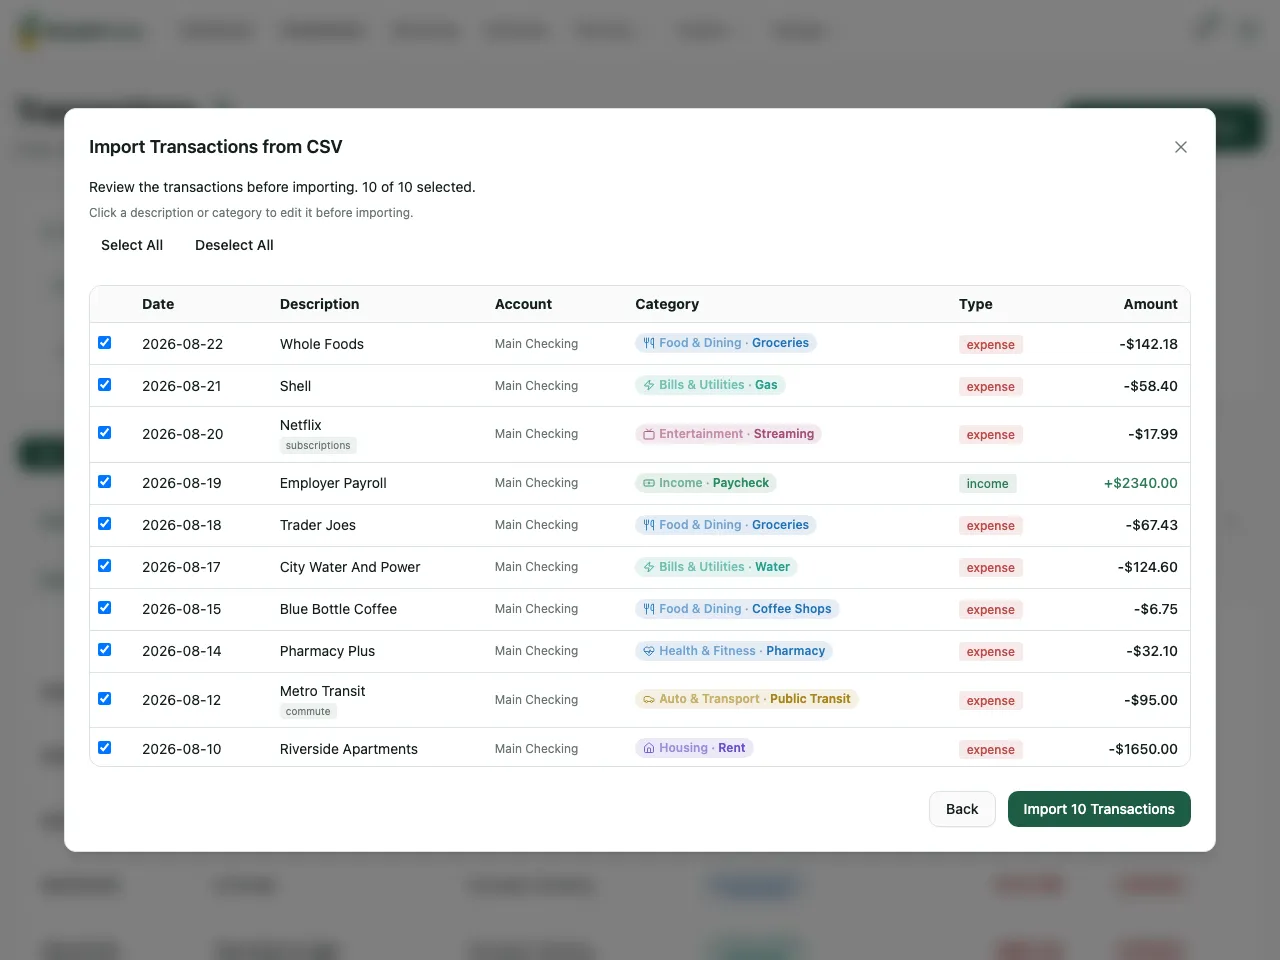
Two things are worth checking in that preview. Every amount arrived as an expense except the payroll row, which is the debit and credit column doing its job. And the Mint labels came across as tags, visible under the Netflix and Metro Transit rows.
Confirm. Your history lands, categorized.
If the result isn’t right, every import is recorded as a batch and you can delete the whole batch and its transactions in one action, then try again with different settings. There’s no need to get the mapping perfect on the first pass.
Check the date range
Worth a specific look for Mint files. Mint’s export covered whatever the app had, but many people exported in a hurry when the shutdown was announced, and some exports captured a shorter window than the person assumed.
Sort by date after importing and check the oldest transaction. If it starts later than you expected, and you have more than one export file, you can import the second one too. Duplicate flagging in the preview means the overlap between the two files gets caught rather than doubling up your history.
If you never exported
There’s no live Mint to go back to, but your history isn’t gone, because your banks still have it.
Most banks and credit card issuers let you download transactions as CSV, often going back a year or more, sometimes several. Log in, find the export or download option in the transactions view, and pull the longest range offered for each account.
What you get is your real spending history without Mint’s categories. WealthMode imports bank CSVs through the same flow described above, and transaction rules can categorize the incoming rows as they land, so the gap closes faster than it sounds. The preview shows you the rule-applied result before you commit, so you can see how much of it categorized itself.
This path takes longer than one clean export, mostly because you’re doing it once per account. It is still considerably faster than typing.
Importing your Mint data: the short version
A Mint export is a normal CSV and it imports cleanly. The one thing to know is that Mint wrote positive amounts with a separate debit and credit column, which is exactly the shape that generic importers read backwards, and which WealthMode handles. If you never exported, bank CSVs get you most of the way there.
For the general version of this move, see how to switch budgeting apps without losing your data. Coming from a different app? The YNAB and Monarch guides cover those exports.
Frequently asked questions
- Can I still export from Mint?
- No. Mint was discontinued in 2024, so there is no longer a live app to export from. This guide covers importing a file you exported before it closed, and what your options are if you never did.
- What does a Mint transactions export look like?
- A single CSV with one row per transaction, typically carrying date, description, original description, amount, a debit or credit type column, category, account name, labels, and notes. WealthMode recognizes that layout, including the debit and credit column that tells it which rows are expenses.
- I never exported my Mint data. What can I do?
- Download CSV statements from your banks directly. Most banks let you export a year or more of transactions, and WealthMode imports bank CSVs the same way it imports app exports. You lose Mint's categories but keep your actual spending history.
- Will my Mint categories come across?
- Yes, if the export includes the category column. WealthMode matches the category names against yours and asks you to place any it cannot match, so you map each unfamiliar name once rather than row by row.