
How to Move From YNAB to WealthMode: A CSV Import Guide
Leaving YNAB doesn't mean rebuilding your history by hand. Here's how to export your YNAB register and import it into WealthMode, step by step.
About this guide: The YNAB steps below are based on publicly available information as of August 2026 and may change. Export locations and file formats are set by each provider and can be updated at any time, so check the current app for exact menu names. Opinions expressed here are our own.
Years of categorized transactions are the reason most people stay on a budgeting app longer than they meant to. It feels like the history lives inside YNAB and leaving means starting from an empty app in January with no idea what you actually spend on groceries.
It doesn’t. YNAB exports your full register as a CSV, and WealthMode reads that file directly. This guide covers the export, what is actually inside the file, and how the import handles YNAB’s particular quirks.
If you’re still weighing the move itself rather than the mechanics, the YNAB alternative guide and the WealthMode vs YNAB comparison cover that side. This post assumes you’ve decided and want your data across.
What moves, and what doesn’t
Worth setting expectations before you start, because no CSV migration carries everything.
Comes across: your transaction history with dates, amounts, payees, categories, memos, and account names, as far back as your export covers.
Doesn’t come across: your assigned amounts per category per month. That is budget data rather than transaction data, and every app models it differently. Practically this means your spending history arrives intact and you set your targets fresh, which takes a few minutes and is usually a welcome chance to drop the categories you stopped using.
That tradeoff is true of any move between budgeting apps, not something specific to these two.
Step 1: Export your register from YNAB
Data export lives in the web version of YNAB. The mobile and desktop apps generally don’t offer a full export, so start by signing in at ynab.com.
Open the budget you want to move, click the budget’s name to open its menu, and choose the option to export your budget data. YNAB produces a zip file. Unzip it and you’ll find two CSVs:
- A budget file, holding your categories and category groups.
- A register file, holding every transaction you’ve recorded.
The register is the one you want. It’s the file with your actual history.
If you only need part of your history, YNAB also lets you select transactions in the register view and export just the selection. The full export is usually simpler, and there’s no advantage to importing less.
Step 2: Know what’s in the file before you import it
Two things about YNAB’s format are worth understanding, because they’re where a careless import goes wrong.
Outflow and Inflow are separate columns. Most apps write a single amount column where expenses are negative. YNAB instead writes two columns, and each row fills exactly one of them. A grocery run has 82.14 under Outflow and nothing under Inflow. A paycheck has the reverse.
This matters because an importer that assumes a single signed column can read every row as income. WealthMode detects the Outflow and Inflow pairing when you upload and switches to reading both columns. You’ll see which columns it picked before anything is imported.
Categories are written as a single text field. YNAB stores a category group and a category, and the export usually flattens them into one string per row. WealthMode reads that text and matches it against your categories, asking you to place anything it can’t match.
Step 3: Import into WealthMode
Create a free account if you don’t have one. The free tier is enough to import and budget, and no credit card is required.
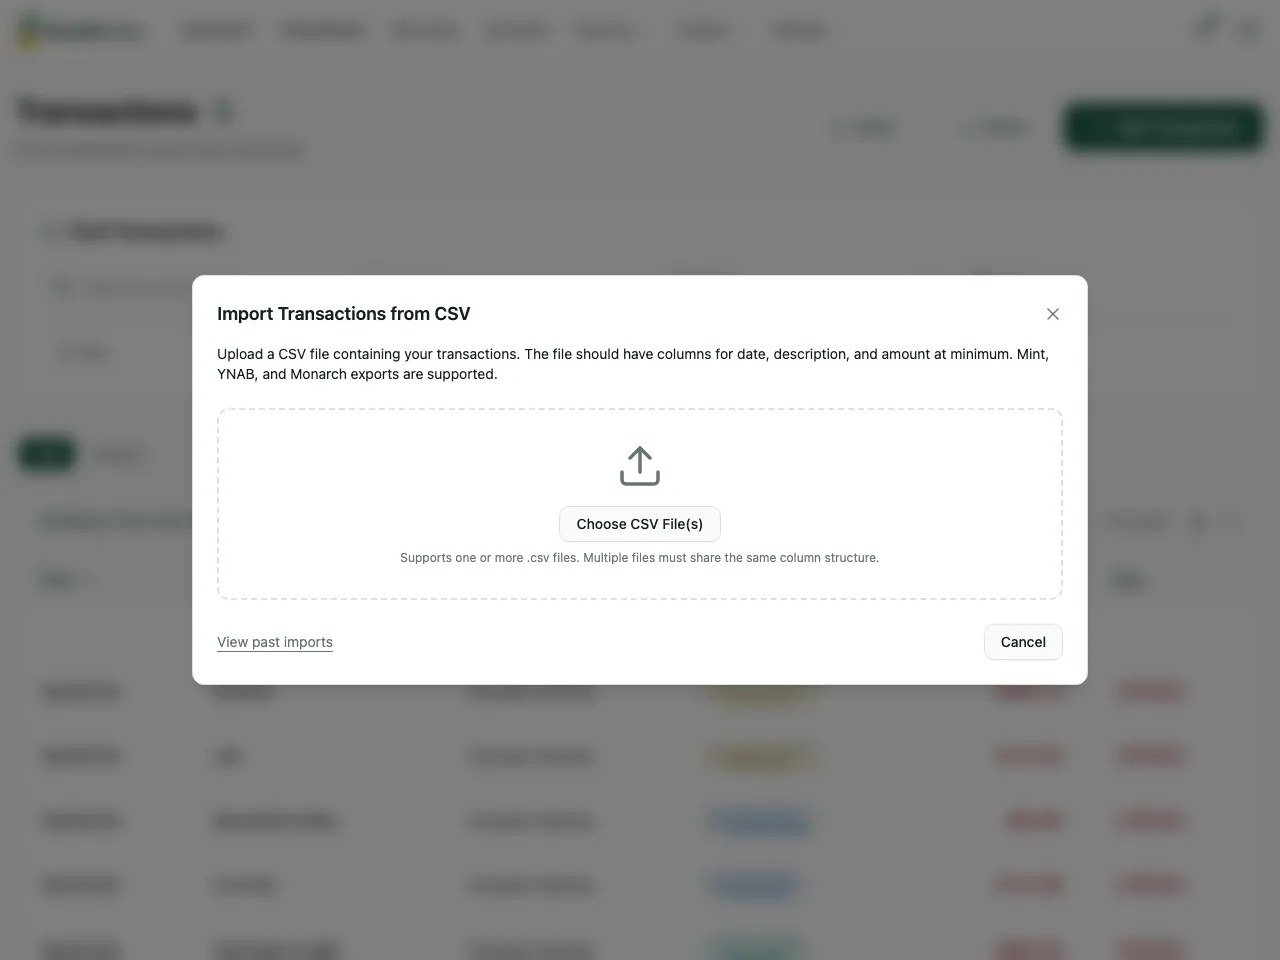
From your transactions, open the CSV importer and upload the register file. What follows is a short sequence:
Upload. You can drop in more than one file if your history is split across exports, as long as they share the same column structure. If the columns differ between files, the importer says so rather than silently merging mismatched data.
Confirm the mapping. WealthMode reads the headers and the actual values to detect whichever of these your file carries: date, description, amount, category, account, tags, and notes, along with the Outflow and Inflow pair. It also works out the date format. Everything it guessed is shown for you to confirm or change.
One YNAB-specific change is worth making before you continue. A YNAB export carries three category columns, and detection picks the first, Category Group/Category, whose values look like Everyday Expenses: Groceries. Switching the Category Column to the plain Category gives you bare names like Groceries, which match far more of your existing categories and leave less to place by hand.
Here is the mapping step with that change made:
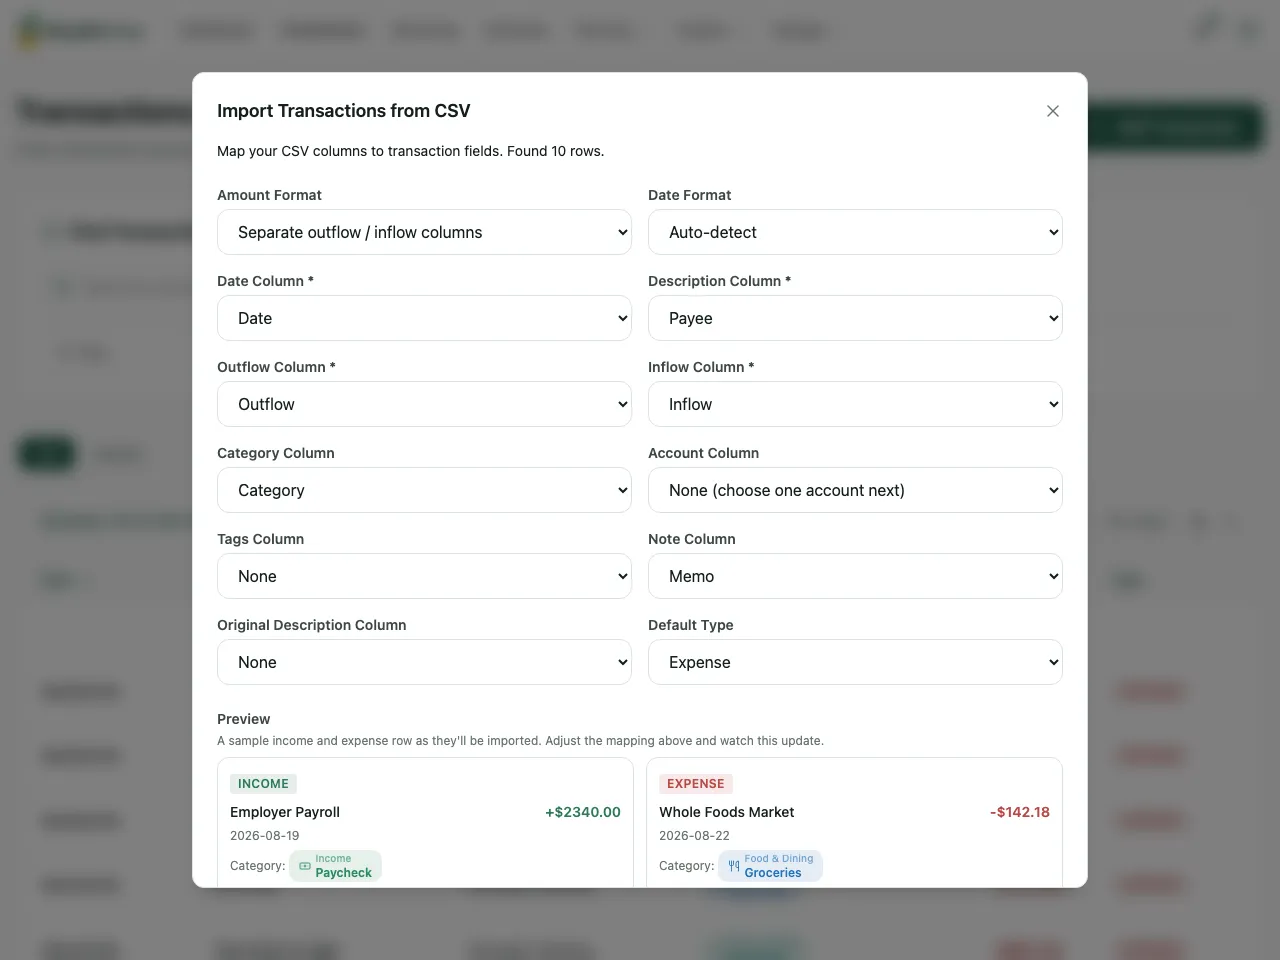
It asks rather than guesses in two cases: when a file has two money columns it can’t identify by name, and when it can’t tell whether expenses are the positive or the negative values. Guessing wrong on either would invert the whole file, so it stops instead. That’s working as intended, not a failure.
Route your accounts. If the file has an account column, match each name to an account in WealthMode, or send everything to one account. Names that already match are pre-filled.
Place any unmatched categories. This step only appears if there are category names the importer couldn’t match to one of yours. You map each one once and it applies to every row using it.
Review the preview. Before anything is written, a dry run shows exactly how the rows will land, with your transaction rules already applied. Likely duplicates are flagged, which matters if you’ve already connected the same account or imported an overlapping file. You can edit a description or category inline, or deselect rows. Rows with an unreadable date are deselected by default rather than imported with a wrong one.
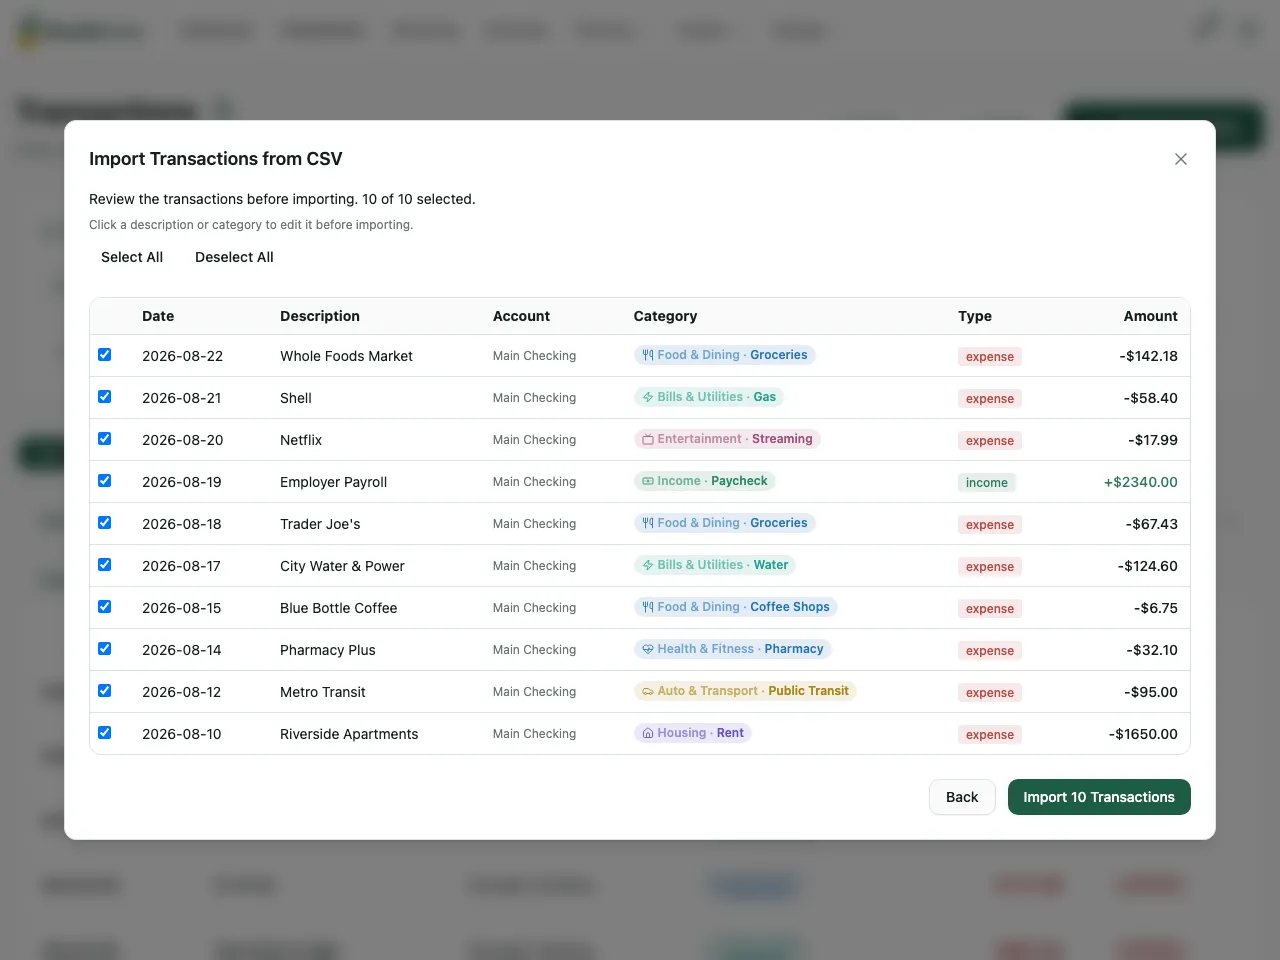
Note the payroll row in that preview. It came from the Inflow column and landed as income, while everything from Outflow landed as an expense. That is the check worth making before you confirm: if your income rows show as expenses, the Outflow and Inflow columns are the wrong way round.
Confirm. Your history lands, categorized, ready to budget against.
If it doesn’t come out right
Every import is recorded as a batch. If the mapping was wrong or you imported the wrong file, you can delete that entire batch and everything it created in one action, then re-import with different settings.
This is worth knowing before you start, because it removes the pressure to get the mapping perfect on the first attempt. A bad import takes one action to reverse, rather than an evening of cleaning up rows by hand.
After the import
A few things are worth doing once your history is in:
- Check the oldest transaction. If it’s more recent than you expected, your export may have covered a shorter window than you assumed.
- Look at your split transactions. If you used splits in YNAB, check how those rows arrived and adjust categories where the detail matters.
- Consolidate categories if you want to. Most people accumulate more categories than they use. Having your history in a new app is a natural moment to simplify, though your imported structure works as-is if you’d rather leave it. The expense tracking page covers how categories and rules work.
- Set your targets. This is the part that doesn’t transfer, and with your real spending history in front of you it’s easier to set targets you’ll actually hit.
Exporting YNAB and importing it: the short version
The move is an export, an upload, and a confirmation. YNAB’s Outflow and Inflow format is the one quirk that trips up generic importers, and it’s handled. Your history isn’t trapped, and the import is reversible if you don’t like the result.
For the wider view of switching apps, see how to switch budgeting apps without losing your data. If you’re moving from somewhere else, the Mint and Monarch guides cover those exports.
Frequently asked questions
- Where does YNAB keep its export option?
- In the web version. Desktop and mobile apps generally don't offer a full export, so sign in at ynab.com, open your budget, and look for the export option under your budget's name. As of August 2026 this produces a zip file containing your transaction register and your budget data as separate CSVs.
- Which file from the YNAB export do I actually need?
- The transaction register. YNAB's export contains two CSVs: one holding your categories and category groups, and one holding every transaction you've recorded. The register is the file with your history in it, and it is the one WealthMode imports.
- Does YNAB's Outflow and Inflow format work?
- Yes. YNAB writes spending and income into two separate columns rather than one signed amount. WealthMode detects that pairing on upload and reads the two columns correctly, so a row with 42.00 in Outflow lands as a 42.00 expense.
- What if the import goes wrong?
- Every import is recorded as a batch. If the result isn't what you expected, you can delete that whole batch and its transactions in one action, then re-import with different settings. You aren't stuck cleaning up row by row.